


A 2D barcode is ready for the retail till only when three things are true on your production line. It is printed to GS1’s size and quality rules. It sits where a checkout scanner expects to find it. And you can prove, every shift, that it scans and carries the right data. For each, you will find the numbers GS1 sets and the checks we use when we set up printing, labelling and vision systems for UK manufacturers.
If you want the wider picture first, our Sunrise 2027 guide to the 2D barcode transition covers what is changing at the till, why it is happening and when each team needs to act.
Since we published that guide, a growing number of food and drink companies have come to us for 2D advice. Many are responding to requests and requirements from major supermarkets ahead of Sunrise 2027. Their questions usually start with whether their existing printers and scanners are ready, then move to where the code goes, print quality and how product data gets into the code.
Key takeaways
- A 2D code is ready for the till only when it passes three separate checks: print quality, the data inside it and, for a Digital Link QR code, where the link goes.
- For till scanning, GS1 sets the module size between 0.396 mm and 0.990 mm and the minimum print quality at 1.5/12/660.
- Place the whole code, quiet zone included, within 50 mm of the centre of the existing linear barcode.
- A scanner only shows that a code read once. Grade samples with a verifier: a code can keep scanning while its grade falls.
Table of contents
- 1. What does “2D-ready” mean on a production line?
- 2. Which 2D codes can a UK retail till accept?
- 3. What size and quality does GS1 set for 2D codes at the till?
- 4. How do you print a compliant 2D code on the line?
- 5. Where should the 2D code go on the pack?
- 6. How do you prove a 2D code will scan?
- 7. Why can a 2D code keep scanning while it fails its grade?
- 8. A line-level 2D readiness checklist
- 9. Where Kelgray fits on your line
1. What does “2D-ready” mean on a production line?
On a production line, 2D-ready means you can print a GS1-compliant 2D code at line speed, apply it where a till scanner will find it and check every code for print quality, data and destination. A code can fail on any one of those while passing the other two, so each needs its own check.
Each failure has its own cause and its own check:
| Where it fails | What goes wrong | What catches it |
|---|---|---|
| Print quality | Modules too small, poor contrast, smudging, a distorted grid, a crowded quiet zone (the clear margin around the code) | A barcode verifier grading the code to ISO/IEC 15415 |
| Data | The wrong GS1 Application Identifier (the number that labels each piece of data), a missing separator character, a bad check digit, more data than the code needs | Validating the encoded data against GS1’s rules, at creation and on the line |
| Destination | A QR code whose GS1 Digital Link web address leads nowhere useful | Testing the link itself, with a phone, before launch |
GS1’s own implementation guideline points out that barcode verification cannot tell you where a 2D code sends someone on the web; that needs a test of its own.
2. Which 2D codes can a UK retail till accept?
GS1 allows three 2D options on consumer products scanned at retail checkouts: GS1 DataMatrix, a QR code carrying a GS1 Digital Link web address and a Data Matrix carrying the same kind of address. During the transition, each is printed alongside the existing EAN-13 or UPC barcode. GS1 Digital Link is a way of writing your GTIN (your product’s barcode number) into a web address, not a separate kind of barcode. A plain marketing QR code does not count, because it does not carry your GTIN in a structure the till can use. Our Sunrise 2027 guide includes a decision tree for choosing between the three.
3. What size and quality does GS1 set for 2D codes at the till?
For consumer products scanned at retail point of sale, GS1 sets the module size of a 2D code between 0.396 mm and 0.990 mm, with 0.495 mm as the target. The minimum print quality is a grade of 1.5, measured through a 0.30 mm aperture under 660 nm red light (written by GS1 as 1.5/12/660).
The module size (GS1’s term is the X-dimension) is the width of one of the small squares that make up the code. These figures are for products scanned at the till only. If the same 2D code is also scanned in warehouses and distribution, GS1 applies a different table (Symbol Specification Table 3, addendum 1), so check that one.
| Specification | GS1 requirement for 2D codes scanned at the till |
|---|---|
| Module size (X-dimension) | Minimum 0.396 mm, target 0.495 mm, maximum 0.990 mm |
| Quiet zone (clear margin on all four sides) | 1 module for GS1 DataMatrix and Data Matrix; 4 modules for QR codes |
| Minimum print quality | 1.5/12/660: overall grade 1.5, 0.30 mm measuring aperture, 660 nm light |
| GS1 Digital Link format | Must use the full, uncompressed form of the web address |
The overall size of the code then depends on how much data it holds. GS1 UK gives a worked example: a QR code 29 modules across, plus its 4-module quiet zone on each side, needs 37 modules in total. At the minimum module size that comes to about 14.7 mm square, and at the maximum about 36.6 mm. More data means more modules, and a bigger code.
On a scale of 0.0 to 4.0, a grade of 1.5 is at the lower end of the pass range: a floor that GS1 describes as suitable for optimal scanning conditions. Because GS1 also asks for an allowance for quality lost between printing and the point of scan, we would aim for a comfortable margin above 1.5. Our guide to UK labelling standards and regulations shows how ISO/IEC 15415, the standard for grading 2D print quality, fits with the other rules a UK label must meet.
4. How do you print a compliant 2D code on the line?
Start with the data. A code that carries only the GTIN never changes and can be printed in advance on the packaging or label. Once a code carries a batch number, an expiry date or a serial number, it changes from run to run. GS1 notes that this data is usually printed on demand at the plant or on the line. Pre-printed stock cannot carry data that is only known at the moment of production, such as the batch and date, which is where printing on demand wins in our comparison of print and apply versus pre-printed labels.
GS1 publishes indicative 2D quality ranges for the main printing technologies. Real results depend on the model, the set-up and the material:
| Technology | Typical resolution (dots per inch, dpi) | GS1’s indicative 2D quality range | Main watch-out |
|---|---|---|---|
| Thermal transfer overprinting (TTO) on film and labels | 203, 300 or 600 dpi | 3.0 to 4.0 | Match the module to the printhead dots; failed printhead elements leave lines |
| Thermal transfer label printing, including print and apply | 203, 300 or 600 dpi | 3.0 to 4.0; GS1 lists 4.0 as achievable for print and apply | Label stock and ribbon must suit each other; glossy labels reflect scanner light |
| Continuous inkjet (CIJ) on many materials, including curved surfaces | 60 to 180 dpi | 2.0 to 3.0 | Limited code height; the printhead distance must stay steady |
On film and labels, thermal transfer overprinting is a natural fit, because the printhead lays down a regular grid of dots. Continuous inkjet reaches surfaces a thermal printer cannot, such as bottles, cans and outer cases, but with less margin above GS1’s minimum. That makes set-up and upkeep on CIJ coders more critical when they print 2D.
GS1 is clear that not every production line, printer or piece of equipment in service can produce a quality 2D code. The first practical step is an audit of each line: what prints there now, at what resolution and speed, onto what material and whether its software can generate a GS1 DataMatrix or Digital Link QR code at all.
Start with an audit of each line
Our 90-minute readiness review covers every printer, applicator and scanner on your lines, and you keep the costed, prioritised action plan.
Speak with a specialistMatch the module to the printhead
Because a thermal printhead is a row of tiny heating dots, each module of a 2D code must be built from a whole number of them. GS1’s guidance is to match the printer’s resolution to the module size.
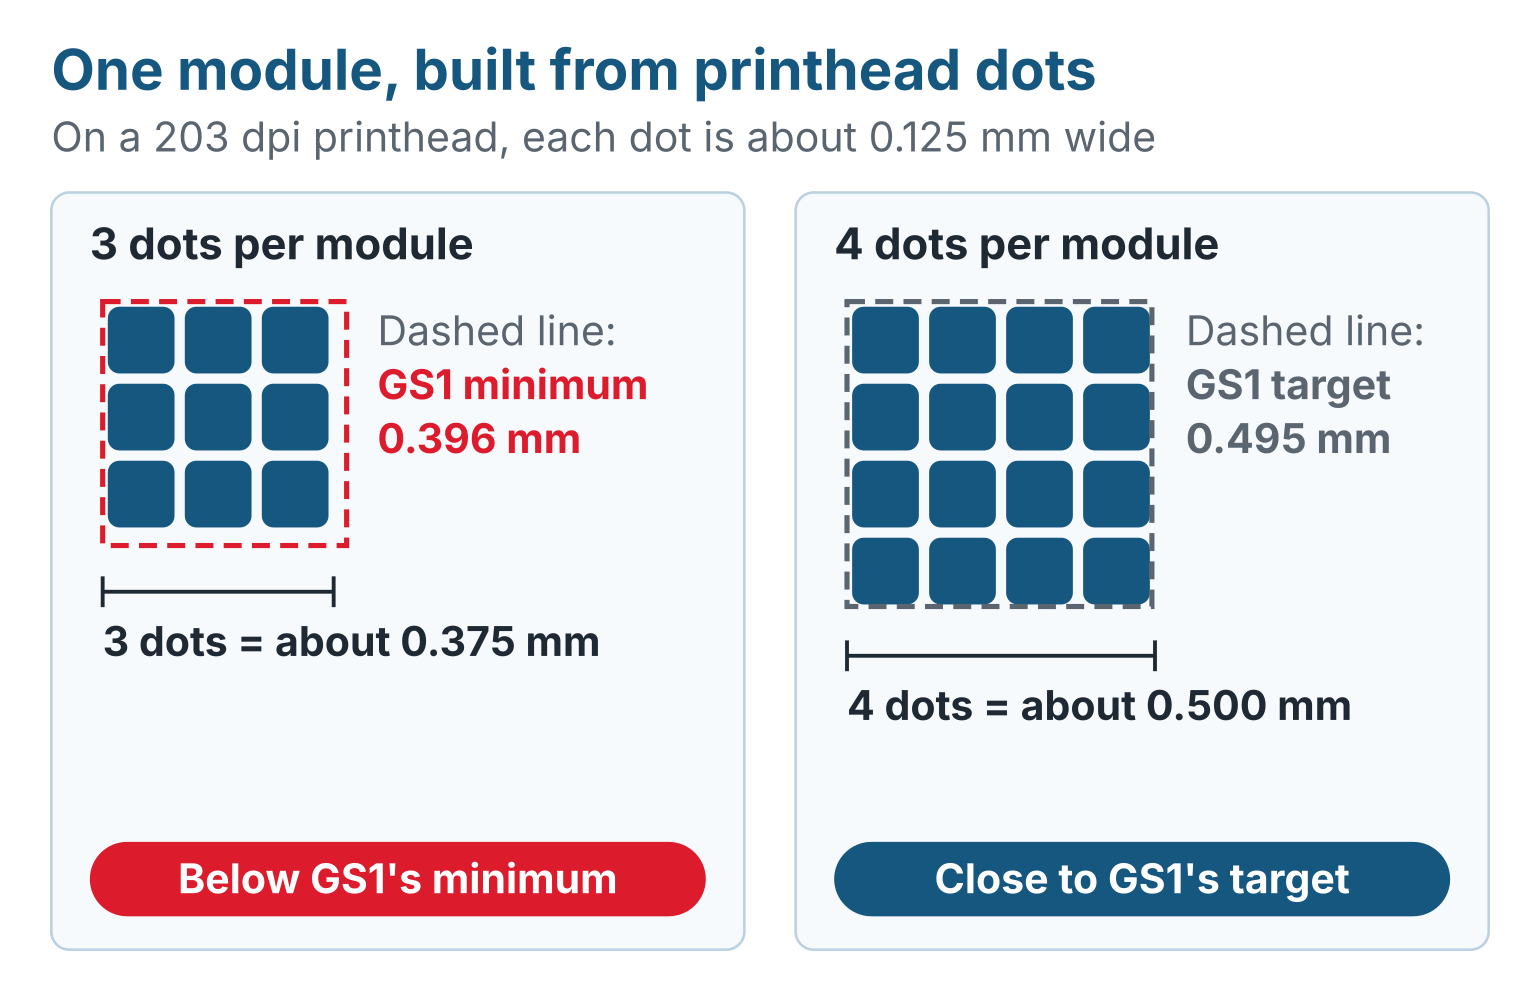
| Printhead resolution | Size of one dot | Dots per module | Resulting module size | Against GS1’s range |
|---|---|---|---|---|
| 203 dpi | about 0.125 mm | 3 | about 0.375 mm | Below the 0.396 mm minimum |
| 203 dpi | about 0.125 mm | 4 | about 0.500 mm | Close to the 0.495 mm target |
| 300 dpi | about 0.085 mm | 5 | about 0.423 mm | Inside the range, near the minimum |
| 300 dpi | about 0.085 mm | 6 | about 0.508 mm | Close to the target |
A printer cannot print part of a dot. So a module size set in millimetres that does not divide into whole dots gets rounded, and the code can come out smaller than planned or uneven. Set the module size in whole dots.
Continuous inkjet builds the code from ink drops instead. Its printhead height, commonly 24 or 32 dots according to GS1, caps how much data will fit. Keep the encoded data short and the distance from printhead to pack steady.
Treat these figures as a starting point, not a setting to copy. In our installations no single module size or print setting works everywhere: the right one depends on the printer, the packaging material, the line speed, the print area and how the code will be scanned. So we test and refine each set-up on the real line until the code prints and scans reliably.
Get the data right before it is printed
GS1 lists label software that leaves out a required character, allows invalid characters or ignores its data rules as a common source of trouble. We would check three things first:
- The FNC1 character. A GS1 DataMatrix starts with an invisible Function 1 (FNC1) character that tells the scanner the content follows GS1 rules. FNC1, or a group separator (GS) character, also marks where each variable-length field ends when another follows.
- The right Application Identifier. A use-by or expiry date (AI 17) is not a best-before date (AI 15). The wrong one is a data error even when the date is right.
- Only the data you need. GS1’s advice is to encode what must be captured automatically and leave the rest to be looked up. Every extra field makes the code bigger. For Digital Link QR codes, use HTTPS, which GS1 recommends as more secure, and keep the domain and any batch or serial number short.
We connect label software to customers’ business and warehouse systems, so batch numbers and expiry dates flow into the code automatically instead of being retyped at the line. A code can scan perfectly and still carry the wrong value or a wrongly formatted date, so on each project we check the data mapping, the code format and the printed result against the customer’s requirements. Where no ready-made connection exists, our own developers build the software integration. GS1’s free Barcode Syntax Resource can also check GS1 data before a code is created.
5. Where should the 2D code go on the pack?
Put the 2D code close to the existing linear barcode. GS1’s testing found that the 2D code needs to sit within 50 mm of the centre of the linear barcode for tills to keep up their target pace of 40 to 70 items a minute. GS1 UK’s preferred spot is the lower-right quadrant of the back of the pack, with the whole QR code, quiet zone included, inside that 50 mm radius.
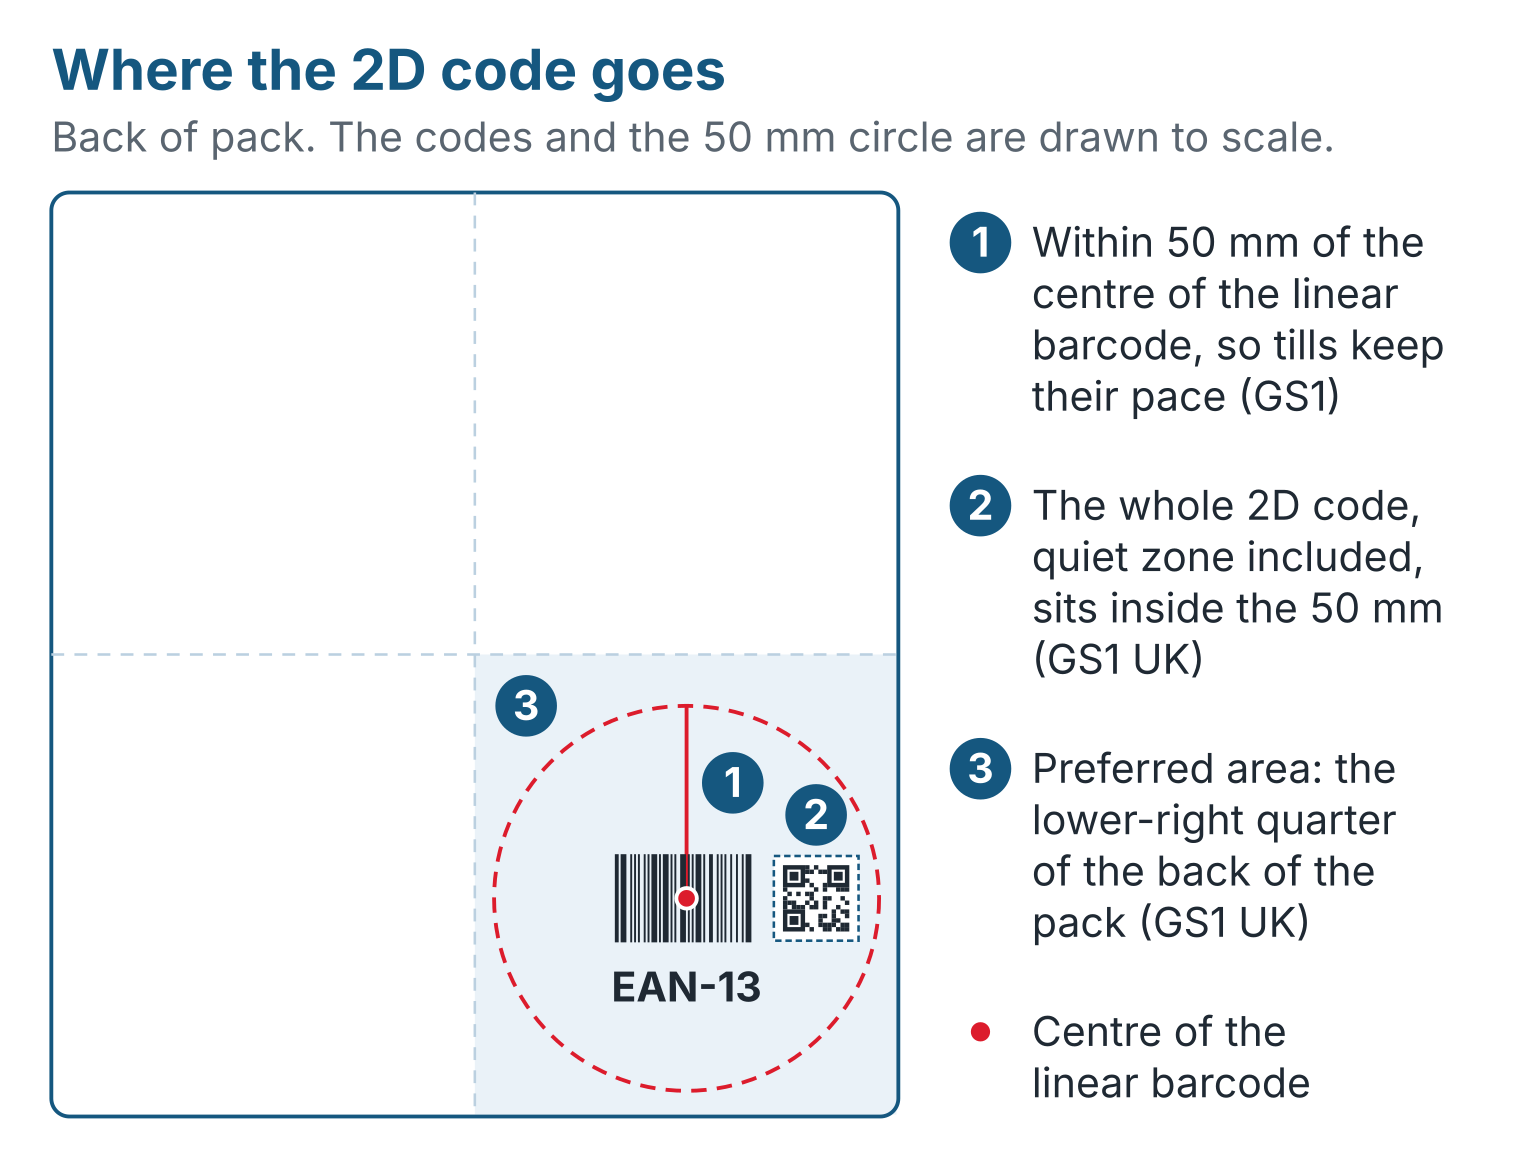
- Human-readable numbers. A 2D code next to an EAN-13, EAN-8 or UPC-A barcode that already shows its digits does not need its own. A 2D code on its own needs the 14-digit GTIN printed with it.
- Clear space and the right surface. Keep the quiet zone free of graphics, folds, seams and pack edges, on a flat, matte area. Glossy film reflects the scanner’s light back into its camera; translucent packs need an opaque background behind the code.
When the code goes on by label, it can only be as well placed as the label. The most common specification mistake we see is choosing the wrong application method for the product: tamp, tamp-blow, blow or wipe-on. A creased label can distort the grid, and a misplaced one can land the code outside the 50 mm zone, so matching the label applicator to the product and line speed matters as much as the printer.
In our print-and-apply work, small adjustments can make a significant difference: moving the label a few millimetres, refining where the code sits on it, or changing the label stock or ribbon. The code has to stay flat, clear and readable once the label is on, so we test each set-up on the actual product and line. Our guide to how print and apply labelling systems work covers the application methods in more detail.
6. How do you prove a 2D code will scan?
You prove it with a barcode verifier, not a scanner alone. A scanner tells you that a code decoded once, under its own lighting. A verifier measures the code against ISO/IEC 15415 and GS1’s specification and gives it a grade. Proving readiness takes both, plus a check on the data inside the code and, for Digital Link codes, on where the link goes.
Under the current edition, ISO/IEC 15415:2024, a verifier checks that the code decodes, then grades its contrast, modulation, grid distortion, damage, spare error correction and print growth (new in 2024) for an overall grade from 0.0 to 4.0.
The regime we recommend has four parts:
- An inline camera on every pack. It reads each code, compares the data with what the line should be printing and rejects failures. In our own installations a check scanner or vision system is standard wherever a label must be readable. Our automated barcode scanning systems read QR and DataMatrix codes on fast-moving packs and flag or divert anything they cannot read.
- Offline verification on a schedule. GS1 notes that inline systems may not test every quality requirement, and advises re-verifying samples against 1.5/12/660 after changes such as a new printhead, label stock or firmware. We would add a check at start-up and at set intervals, and after a ribbon change.
- A data check. Confirm that the decoded content has the right Application Identifiers, check digit and structure, as well as the right batch and date.
- A destination check. Scan each Digital Link code with a phone before launch and confirm it reaches the intended content.
We can build verification into a line alongside printing and inline inspection, and we offer formal verification with 2D grading where it is required. The scope is agreed with each customer, from checking sample labels to verification across a whole production process. GS1 UK also offers a review of barcode and QR code artwork before print and a verification service for printed labels and products.
7. Why can a 2D code keep scanning while it fails its grade?
Because 2D codes carry error correction. When part of a code is damaged, the scanner uses spare capacity built into the code to rebuild the missing data, so the code keeps reading while its grade falls. The problem stays hidden until further damage uses up the remaining margin and the code fails to read at the till.
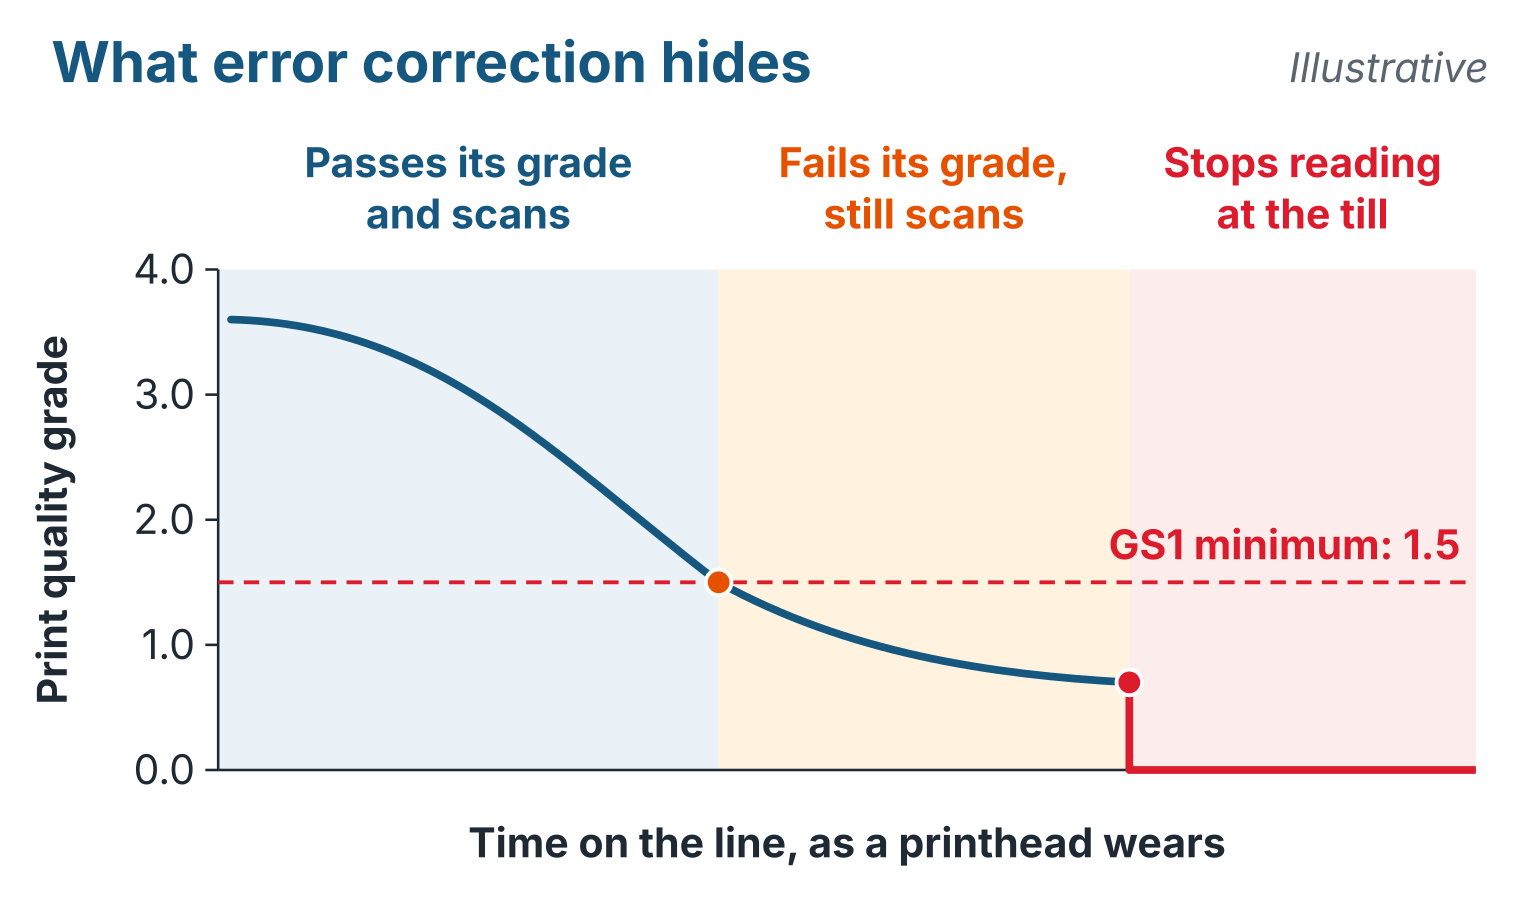
When one of a thermal printhead’s heating elements fails, it leaves a thin blank line through every code printed afterwards, in the same place. The code may still decode, but only because the scanner is spending error correction to repair the line. GS1 notes that moving the code’s position in the label design can steer it away from a failed element: a useful stopgap while a replacement printhead is on order.
Across the sites we visit, we put roughly nine in ten labelling problems down to poor maintenance and working routines, not wrong information. That figure is our own field estimate, but it points straight to the fix: a printhead cleaning routine that follows the printer maker’s schedule, with a named owner on each shift.
Our vision systems do more than pass or fail each code. They grade its print quality and log the result for each label, so a downward trend shows up while the codes are still scanning. Watch that trend, not just the pass or fail: a code that passes every day at a slowly falling grade is a warning that gives you time to act.
When we are called out to a line, we check the printhead or coding equipment first, then the ribbon and the packaging material, then settings such as speed, pressure and alignment. A dirty or worn printhead can make parts of a code drop out, a ribbon that does not suit the surface can cut contrast or durability, and a small set-up change can affect consistency.
8. A line-level 2D readiness checklist
- Step 1Audit each line
- Step 2Fix the data
- Step 3Size to the printhead
- Step 4Place by the barcode
- Step 5Keep verifying
Use this as a working list for each line that will carry a 2D code:
- The printer on this line can print a module size inside GS1’s 0.396 to 0.990 mm range at full line speed, tested on the real film, label or carton
- The module size is set in printhead dots, with no rounding
- The quiet zone is clear: 1 module around a DataMatrix, 4 around a QR code
Data
- FNC1 is present at the start of a GS1 DataMatrix, with FNC1 or GS after each variable-length field except the last
- Application Identifiers are correct, check digits validate, and only the data you need is encoded
- Batch and date data come from your systems, not from manual entry at the line
Apply
- The whole 2D code, quiet zone included, sits within 50 mm of the linear barcode’s centre
- A stand-alone 2D code carries the 14-digit GTIN in human-readable form
- The code sits on a flat, non-glossy area, clear of edges, folds and seals
Verify
- An inline reader checks every pack and rejects failures
- Offline verification against 1.5/12/660 at start-up, on a schedule and after any printhead, ribbon, label or firmware change
- Each Digital Link destination tested with a phone before launch
⚠ Common 2D mistakes to check for first
- A plain marketing QR code on pack, assumed to count for the till
- A logo worked into the QR code, which GS1 treats as damage the code has to absorb
- Red, orange or yellow codes, which red-light scanners and verifiers struggle to see
- A pre-printed code on a product that needs batch or expiry data in it
9. Where Kelgray fits on your line
Getting a 2D code right takes the printer, the label, the applicator, the camera and the data working together. We are a UK manufacturer of print-and-apply machines with our own label production, and we supply and support thermal transfer overprinters, continuous inkjet coders, label printers, ribbons, vision systems, barcode verification and the software that connects them. So one team can audit a line, change what needs changing and prove the result.
We have supplied UK businesses since 1972, as a family-owned company accredited to ISO 9001; there is more about us on our site. To find out where your lines stand, call us on 01293 518733 or email hello@kelgray.co.uk. We will come back to you within one working day to confirm a date for a readiness review.
Book your free 2D readiness review
In 90 minutes on site, we will walk your production floor with you, check each printer, applicator and scanner against GS1’s 2D rules and hand you a costed, prioritised action plan you keep, whether or not you work with us afterwards.
Speak with a specialistSources
- GS1, 2D Barcodes at Retail Point-of-Sale Implementation Guideline, version 1.1, December 2025 (ref.gs1.org/guidelines/2d-in-retail): approved 2D options at retail point of sale, symbol specification figures, placement and human-readable text, data encoding, printing technologies and verification.
- GS1, GS1 General Specifications, Release 26.0, January 2026 (ref.gs1.org/standards/genspecs): section 5.12.3.1, Table 5-46, GS1 Symbol Specification Table 1, addendum 2 (2D barcodes for trade items scanned at general retail point of sale and not in general distribution); section 4.14.2 (human-readable interpretation at general retail); section 4.15 (managing multiple data carriers).
- GS1 UK, Where should the QR code go on retail packaging? (gs1uk.org, last reviewed January 2026).
- GS1 UK, How big should a QR code powered by GS1 be? (gs1uk.org, last reviewed February 2025).
- GS1 UK, Get your barcodes and QR codes reviewed (gs1uk.org, barcode and QR code checking service).
- GS1, GS1 Barcode Syntax Resource (gs1.org).
- ISO/IEC 15415:2024, Bar code symbol print quality test specification: two-dimensional symbols.
- ISO/IEC 16022:2024 (Data Matrix) and ISO/IEC 18004:2024 (QR Code) symbology specifications.